 |
| Black Core Foamboard Let's begin this tutorial with some information about foam board. There is expensive and cheap. The expensive type is thicker and more durable. It comes in pieces about 30 X 30 and can be purchased online or at your local art supplier. I would suggest this type if you are making pieces that will be shipped or handled a lot. It will also resist warping over time. It will look more professional. Cheap means sheets of 22 X 30 or 30 X 30, hobby store type. It will not have the same coating on the surface, but is ok for exhibits that will not be mailed or handled too much; or for temporary use. I use black because I like the way it looks from the side, but it also comes in white. If you choose black, it has a white core or black core. What you see pictured is black core. It is a personal choice. Black core will cost a little more. If you have a heavier piece, I would suggest that you double it by glueing two pieces together. It will be stronger.  Mark your outline of your work on the your sheet of foam board with a chalk or lead pencil. Use your ruler to keep things straight. Try to follow the edge of your work with the ruler. You want your board to be exactly the same size as your quilt. If it is any smaller, It will cause a strain on the edges that will pull stitches. Before you cut it out, mark the top on the board. You may think that your quilt is square, but that is not always the case. Label it TOP and FRONT. This will save you confusion later.  After you chalk your square on the board and label it top and front, get out your cutting tool. I prefer a good quality box cutter, but you can also use an Exacto Knife. If you have never used one of these tools before, it is best to keep your wrist straight and the tool should not lean in or out. This will give you a better cut, but I rarely am able to keep from having a bevel here or there. Use your ruler to help guide it. This should take a couple of passes for the first cut. Do not try to cut all the way through. Cut from the top of the board to the bottom so you can set it up on end.  Bend board toward back to expose cut. Then bend forward with a pop to release it. This will give you a clean break. This is your first cut. Now repeat this for next side until you have your square. This becomes a little more tricky if you are cutting curves. You cannot do the bend and snap method. You will just keep passing the knife through the channel until it is clear. Patience will have it's reward.  Now is when you will have to line everything up and clamp it. If you marked the top and front, you should be able to readily see which side the quilt is placed on. This is easier with smaller works. Try to stretch to fit and clamp. This will keep your quilt from bagging. in the center. The edges should come right to the edges of the board. I have not had many that needed additional trimming. 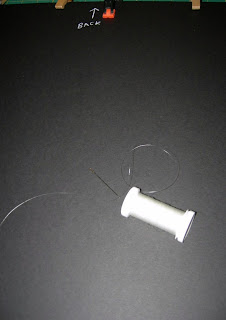 You are now looking at clear thread and a large needle. This is how you will attach the quilt to the board. You will be tacking and tieing off; not doing a running stitch. It is inevitable that stitches will pop after time. You do not want to replace a whole line of stitches. You can replace the tacked stitch, one at a time. (I am now recommending Fireline, as it is much stronger. It can be found in the beading stores) Double your thread and have a long tail. If you do not allow enough thread tail, it will be hard to grab on and tie it off. If you have a lot of fused places, it will be harder to push the needle through. I tack a couple of places near the center first. Push the threaded needle all the way through to the front and hold onto the tails to keep them from going through. (Update) There is an alternative method to attaching the quilt to the foam board at the end of my tutorial.  This shows you the position to balance your work on the edge of your table. I pull my chair up to the edge and am able to manage the needle going through from top to underneath. Once the needle has cleared, flip the work over. If you put the needle at an angle coming back, you will get a small bite in the front and a wider bite in the back. That is the most desirable method. Cut the needle off and hold onto the tails. Tie off with a double knot that is not too tight. Leave a little play, but not too much.  Lets talk about saving your hands. If you have arthritis or don't want it in the future, preserve your hands. I have had to have surgery on my thumb, due to arthritis. I use hemostats to clamp onto the needle and pull it through.  The number of stitches you need depends on size and weight of your quilt. But look for bagging or unwanted buckleing. I like to do the most stitches around the edges. On pieces that are heavily embellished, you may have to take the bites on the back of the quilt, instead of going all the way through.  Ok, you worked hard and your hands are tired, so lets take a break and talk about the hanging device. I like to use the wooden stretcher bars that you find at Hobby Lobby. They come in individual bars that slide together at the corners to make your rectangle or square. They have groves that fit together when tapped with a hammer. Nothing to it. Easy. You can also use a prepared canvas, but then you must deal with the thickness of the canvas. You could possibly use a picture frame, but I have not had good success with them, as the wood tends to be very hard to put the screw eyes in. Make sure that the size of the hanging square is smaller than the foam board. Center the square, leaving at least 3 1/2 inches from the top down. If you do not measure the top level, you will ruin your piece and have to destroy it. It will hang crooked. (Ask me how I know) Measure twice or more; then mark with chalk around the square.  Take a look at the chalked square. Does it look right? This is the time for changes, not later. Is your center marked? Ok, you are ready for the glue. After this, there is no turning back.  It is easier to put the screw eyes on now, before the glue. You can also attach the wire if you know how long you want it. Remember to leave some space at the top for the hook that you will be hanging it on. You don't want it to show above your work. Measure where the screws should go. You will have the grooves to contend with at the edges. If you hang your wire from the top, it will stay flush against the wall. If you place the screw eyes on the sides or back, it will tip slightly from the top. Either way is ok. I prefer the top mount.  I like to use Gorilla Glue. It is the strongest glue on the market. I think you could also use wood glue. Gorilla Glue will expand (big time) and if you don't clamp your hanging device or weight it down, it will move. That may be true of the wood glue also. Don't be too stingy, but it does expand.  This is optional. I paint the wood to make a more professional look. It also covers places where the glue expanded too far and looks unsightly. I just use acrylic. Check to make sure your hanging device made good contact. (ask me how I know) Yep, did that too.   Ok, that's it. I am tired out and I know you are. I can hear someone saying, "That's too much work!" It sure is. If you have some better ideas, let me know. jufergu@yahoo.com UPDATE FOLLOWS. Thanks to emails from members on quiltart networking site; I have an alternative way of attaching the quilt to the foam board. I would think that the method you choose, would depend on the size and weight of your quilt and possibly how long you intend to keep it on the foam board.  It was suggested that the quilt could be attached by using either pins or T-Pins. The process would start from one end being pinned, catching the back side of the quilt and burying the pins behind the binding so that it is not visible. Once the edge is attached, roll the quilt back on itself and start attaching the backing down the length, until you get to the opposite edge. Repeat the edge treatment and check the side edges to see if they need extra pins. Short term, the shorter pins would be easier and cheaper if you have a lot of work gone at the same time. Long term, I am not sure that the short pins would not corrode. The T-Pins would do better over time. The T-Pins would also hold more securely. Do It Yourself Framing With Foam Board Some exhibits have the stipulation that your work must be framed to enter. You have 2 choices. One is to take it to a professional and pay the big bucks for the best job possible. But suppose you don't have the big bucks and you are exhibiting in small towns where no one will pay the big bucks for fiber art. Here is a cheaper route, if you don't mind the investment of time and energy. I would like to give credit to my good friend and professional framer Karen Larsen who talked my through this process.  The beauty of using foam board for mounting, is that it can be cut to any size frame, unlike mounting on prepared canvas. Here I have a second hand frame of good quality. The problem with it is, that it is an odd size of 14 X 20. I lay my frame on top of my foam board and use a white pencil to trace the opening that my mounted work will be fitted. Place you pencil under the frame as it lies face up. You will have to reposition it in order to get a good trace running you pencil under the rim. Frames are like anything else. They are seldom perfect. You could also take the time to just measure your opening. I find this faster.  You will be cutting outside of the line on your first try. This is safer, as it will not be too small and ruin the piece. It is better to trim again than to throw away.  This is where you make a judgement of how much space your work will require. If you are mounting something with batting, you will have to do more trimming away. For this illustration, I used a single thickness of fabric for backing. So my foam board fits with just a slight gap around the edges. Trial and error as each fiber art will be different.  This is my single piece of backing fabric. You are looking at the back side. I am using the float mount technique, so you see my stitching, where I stitched through the backing, catching the backing of my fiber art. Centering and measuring is required. You want to leave enough room to wrap the edges.  This is a view of the front side before it is wrapped onto the foam board. Since I will be gluing my final element on, I did not attached anything else.  Here is the back view of my piece with the background fabric wrapped, leaving about 2 inches to be glued down. The glue I am using is FABRI TAC made by Beacon Adhesives. I like it because it is clear, heavy bodied and dries fast. I was worried that hot glue might warp or melt the foam board, but you might do a test if you think it would work for you. I placed straight pins along the edge to hold every thing in place until it is glued. Just insert them right into the edges of the foam board, all the way around. No need for clamping with this glue. Place a ribbon of glue all the way around. Use some extra at the corners to hold the extra fabric that is folded over. Allow about an hour for drying.  My wrapped artwork is now dry and looks great. I remove the pins and everything stays in place. I place it into the frame opening and it is not too tight or too loose. Just right. Now the exciting part. TOOLS YOU WILL LOVE. This is a PICTURE FRAME PLIER. I got it at http://www.highlandwoodworking.com/ It does the most wonderful insertion of one inch brads that is possible. Yes, you can use a hammer and beat up the foam board and have crooked nails. But this tool was less that 20.00 even with the shipping. USA, that is. 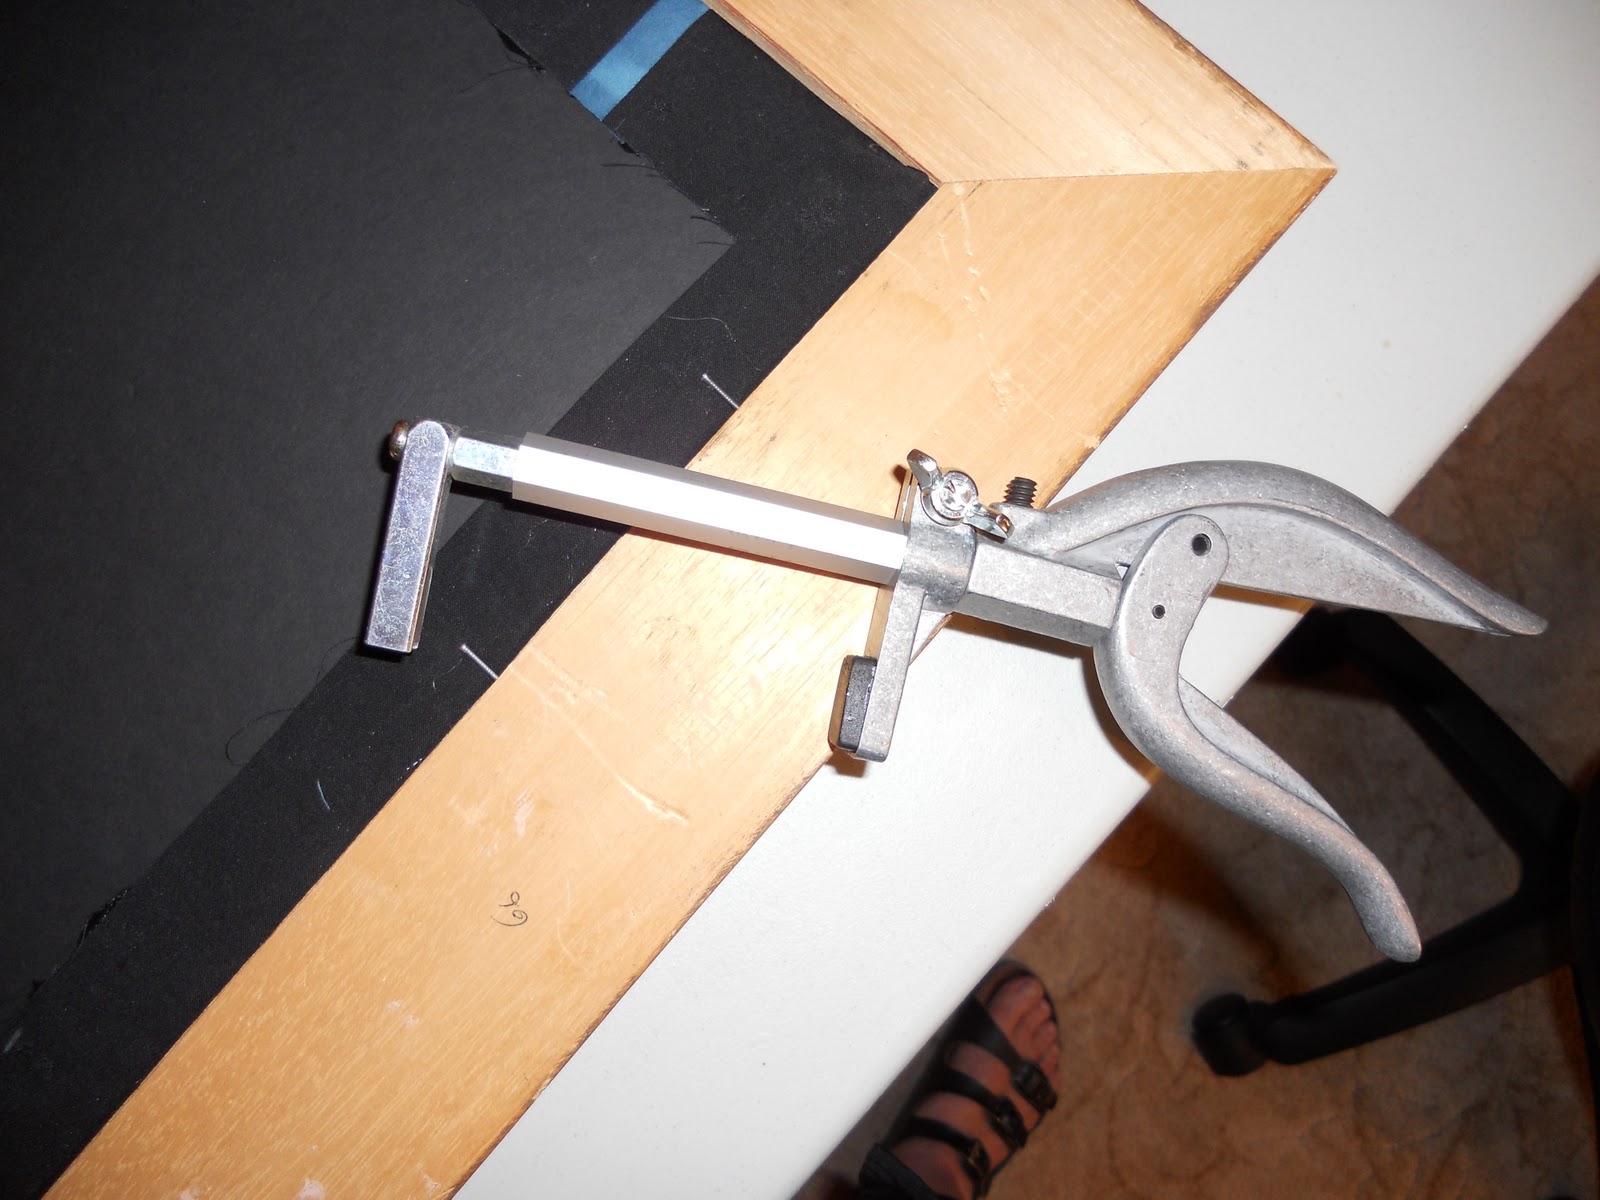 This plier will do a frame up to 3 inches wide. My frame was almost 3 inches so I opened it out to it's fullest expanse. The top has a magnet that will balance your nail as you bite down. With very little practice I was able to use this tool like an expert. Squeeze the handles together and the nail glides right in up close to your foam board. I have very arthritic hands and was so surprized at how easy this was. The trick is to keep your wrist from tilting.  Here is the back of my artwork after all the brads are in place. I think it looks good enough. But suppose you are a perfectionist. So you go to the next step.  You can cover your opening, or even your whole back, with brown paper that you buy on a roll at the craft store. I used the same glue around the edges.  Screw eyes and wire come in different weights. This eye is a medium size. If your frame is very heavy, make sure you have the proper size for it's weight. Wire also comes in different weights. I usually use the medium. I do not use glass for my fiber art. So it is lighter. THE FINAL RESULTS  Here is my float mounted, fiber art. Yes, it took me a whole day from start to finish to frame this. But I think it looks very good and saved me a lot of money. I can now put a better price on this and hopefully, make a little money for my labor. I hope this tutorial has been a help to you. |
Gallery Hanging Tutorial
Subscribe to:
Comments (Atom)